Back to menu
View all Our Products
Door Hardware
Joinery Hardware
Handles and Knobs
Hinges
Sliding Hardware
Lighting
Ironmongery Ranges
Back to categories
View all Door Hardware
Dörepack - Ironmongery Kits
Door Straighteners
Door Closers
Door Furniture
Locks and Latches
Panic Hardware
Signage
Front Door Furniture
Seals
Accessories
Glass Door Fittings
Pocket Door Hardware
Back to Door Hardware
View all Door Closers
Concealed Overhead Door Closers
Concealed Side Mounted Closers
Electro Magnetic Door Closers
Floor Springs
Pivot Sets
Slide Arm Overhead Closers
Surface Mounted Overhead Closers
Back to Door Hardware
View all Locks and Latches
Budget Locks
Cylinder Locks
Digital Locks
Electronic Access Control
Forends, Strikes and Intumescent
Mortice Locks
Mortice Deadlocks
Mortice Escape Locks
Mortice Latches
Mortice Nightlatches
Mortice Sashlocks
Padlocks
Rebate Sets
Restricted Keys
Rim Locks
Safes
Tubular Deadbolts
Tubular Latches
Rim Nightlatches
Push Button
Cabinet Locks and Latches
Push to Close
Roller Catches
Gate Latches
Mortice/Rim Knobs
Door Latches
Flush Bolts
Security Bolts
Cottage Latches
Latch Sets
Deadlock Cases
Bathroom Locks
Back to Door Hardware
View all Signage
Bespoke Signs
Fire Door Signs
Numerals
Symbols
Letters
General Signage
Back to Door Hardware
View all Front Door Furniture
Door Viewers
Letter Plates
Knockers
Door Chains
Bell Pushes
Back to Door Hardware
View all Accessories
Door Bolts
Door Holders
Door Stops
Emergency Door Stops
Finger Protectors
Foot Pulls
Hat and Coat Hooks
Spindles and Fixings
Sills and Thresholds
Back to categories
View all Joinery Hardware
Drawer Runners and Box Systems
Cabinet Components
Kitchen Components
Panel Fixings
Lift Systems, Stays and Dampers
Door Straighteners
Assembly Devices and Jigs
Window Hardware
Workshop Consumables
Rails, Fixtures and Fittings
Back to Joinery Hardware
View all Drawer Runners and Box Systems
Accuride Runners
Ambialine
Ball Bearing Runners
Cutlery Trays and Dividers
Dovetail Drawers
Legrabox Drawers
Metabox Drawers
Movento Runners
Servo-Drive
Standard Runners
Tandembox Drawers
Tandem Runners
Heavy Duty Runners for Pull Out Storage
Back to Joinery Hardware
View all Cabinet Components
Cabinet Hanger Systems
Cable Outlets
Castors Feet and Legs
Fixing Materials
Glass Door Locks and Hinges
Magnetic Catches and Bolts
Plinth Feet
Push to Open
Cabinet Pulls
Cabinet Locks and Latches
Door Buffers and Dampers
Mirrors and Glass
Back to Joinery Hardware
View all Kitchen Components
Accessories
Legs
Taps
Towel Rails
Waste Bins
Wirework Storage
Worktop Bolts
Electrical Sockets and Plates
Power Docks
Hooks
Shelving
Ducting
Vents and Grilles
Back to Joinery Hardware
View all Panel Fixings
Button-fix
Connecting Fittings
Fastmount Installation Tools
Fastmount Low Profile LP Range
Fastmount Metal MC Range
Fastmount Panelsafe PS Range
Fastmount Standard PC Range
Fastmount Textile TC Range
Fastmount Very Low Profile VL Range
Back to Joinery Hardware
View all Lift Systems, Stays and Dampers
Aventos Lifts Systems
Stays and Dampers
Gas Struts
Back to Joinery Hardware
View all Window Hardware
Casement Fasteners
Casement Stays
Sash Lifts
Sash Fasteners
Fanlight Catches
Pole Hooks
Quadrant Stays
Espagnolettes
Sash Pulleys
Winders
Back to Joinery Hardware
View all Rails, Fixtures and Fittings
Bathroom Fittings
Office Fittings
Handrail Fittings
Wardrobe Fittings
Bedroom Fittings
Curtain Rail Fittings
Screws
Nails
Bolts
Mounting Brackets
Shelf Supports
Bookcase Strips and Studs
Back to categories
View all Handles and Knobs
Lever Handles
Door Knobs
Pull Handles
Cabinet Handles
Edge Pull Handles
Flush Pull Handles
Centre Door Knobs
Multi-Point Handles
Knurled Handles
Escutcheons
Turn and Release
Back to categories
View all Hinges
Heavy Duty Hinges
Blum Hinges
Salice Hinges
Butt, Parliament and Rise/Fall Hinges
Concealed Hinges
Continuous Hinges
Flush Hinges
Sprung Hinges
Gate, Tee and Strap Hinges
Torque Hinges
Pivot Hinges
Counter Flap Hinges
Back to Hinges
View all Blum Hinges
Accessories
Cover Caps
Mounting Plates
Face Frame Hinges
Hinges - Soft Close
Hinges - Non Soft Close
Back to Hinges
View all Salice Hinges
Salice Air - Concealed Hinges
Conecta Hidden Soft Close Hinges
Pacta Compact Hinges
Air Push to Open Hinges
Back to Hinges
View all Butt, Parliament and Rise/Fall Hinges
Butt Hinges
Parliament Hinges
Rise and Fall Butt Hinges
Tritech Hinges
Back to Hinges
View all Concealed Hinges
Tectus Hinges
Anselmi Hinges
3D Concealed Hinges
Soss Hinges
Concealed Cabinet Hinges
Hettich Hinges
Concealed Hinges for Overlay Doors
Back to categories
View all Sliding Hardware
Hawa Sliding Door Hardware
Coburn
Salice
Straight Sliding
Folding
Accuride Pocket Door
Slido
Multi-directional
Round the Corner
Blum Pocket System
Sugatsune Sliding Door Systems
Back to Sliding Hardware
View all Hawa Sliding Door Hardware
Hawa Acoustics
Hawa Clipo
Hawa Combino
Hawa Concepta
Hawa Junior
Hawa Media
Hawa Multifold
Hawa Porta - Straight Sliding
Hawa Super
Hawa Varioflex
Hawa Aperto
Back to Sliding Hardware
View all Salice
Exedra Pocket Door System
Exedra2 Smart Pocket Door System
Salice Accessories
Back to categories
View all Lighting
Bespoke Lighting Solutions
Cabinet, Plinth and Display Lighting
LED Tape and Profiles
Drivers and Power Supplies
Switches and Sensors
Ceiling Lights
Accessories
Clearance
TECTUS
The Revolutionary Concealed Hinge System
The concealed hinge you don't need to hide!
There is no other hinge system in the world that provides the same solutions as TECTUS® from Simonswerk.
Made in Germany, TECTUS® is the most comprehensive concealed hinge system for premium flush doors. With features such as easy adjustment across 3-Dimensions, TECTUS® hinges bring an unparalleled level of performance, precision and control and have solved issues over what have previously been a difficult to build and maintain.
For architects and designers alike, choosing TECTUS® can make the difference between realising your vision and having it remain just a vision.
When interior designers spend time detailing an "invisible" door, they can go through endless rounds of picking the right veneer to match the grain exactly, wanting to simply keep clean and dead-even gaps around their door panels. As TECTUS® is adjustable in 3-dimensions, large and heavy doors can be quickly installed, saving money for the millworker and installer and insuring it all looks precise in the end.
In reality, for detail-driven designers, nothing is ever really completely invisible. At the very least, when you open that door, the hinge better match the finish of the hardware on the rest of the project giving a professional overall effect. Simonswerk offers the TECTUS® hinges in a wide range of premium quality finishes to do just that.
For example the SIMONSWERK original Metallic Bronze finish is now joined by three new bronzes to complement any interior themes.
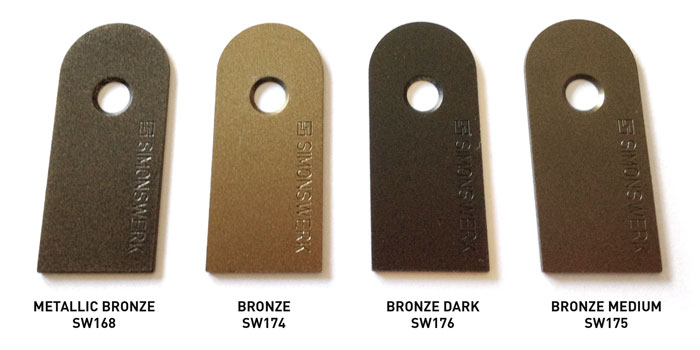
Tectus features:
- Easy adjustment in 3-dimensions for precise and efficient installation and maintenance of flush doors.
- High load capacities from 88lbs to 660lbs when using just two hinges.
- Wide range of premium auality finishes
- Mainenance-free and tested beyond 1,000,000 cycles without any wear, using no oil or grease.
- 180° Opening angle.
- UL Listed for all models except TE 240 3D.
- TE 526 3D Series and TE 626 3D A8 hinge provide a 3-HOUR rating.
- Models for doors with cladding up to 8mm (~.315") ideal for laminates (e.g.mirror, stone facing, etc.).
- TE 541 3D FVZ for frameless flush doors hung on a recessed jambs (e.g. 1/2" drywall>1/8" gap>door).
- TECTUS® ENERGY has the capability for permanent power transfer or electric lock and security systems.
- Complete milling & installation support with templates and installation tools available.
- Versatile and suitable for wood, metal (with SZ receiver) and casing frames (with FZ fixing plate).
- Engineered and made in Germany by Simonswerk giving TECTUS unquestionable manufacturing standards.
Installation instructions:
Prepare Frame and Door Leaf
via Plunge Router :
Using Simonswerk's routing templates, prepare the leaf and frame using the appropriate router bits and 30mm bushing guide. Index-d can help provide the appropriate tools for your specific model.
via Plunge Router :
use the milling template documents (dxfs) supplied by Simonswerk to prepare the leaf and frame.
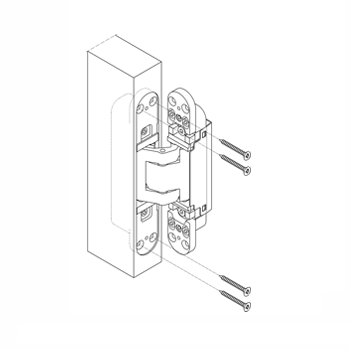
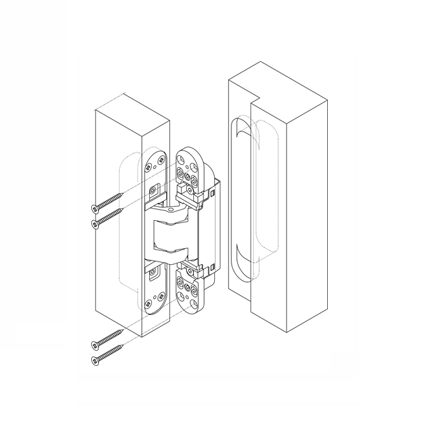
Mount Hinges to the Frame
Block Frame : Conduct routing according to Simonswerk routing data. Use Ø24mm Router Bit ( except with TE 240 3D, use Ø16mm ) and a Ø30mm Bushing Guide. Install hinge to the frame with enclosed wood screws.
Casing Frame : To ensure a secure mounting, use the Simonswerk fixing plate required for each hinge. Mount the fixing plate by means of appropriate screws (not included) behind the casing. Install the hinge to the plate and frame by using the enclosed M5 screws.
Steel Frame : After affixing the Simonswerk steel frame receiver to the inside of the frame, mount hinge by using the enclosed M5 screws.
Adjustment in Three Dimensions
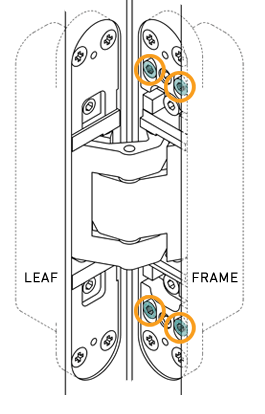
Vertical Adjustment: Step 1 - Slightly loosen the clamping screws using the 4mm hex key.
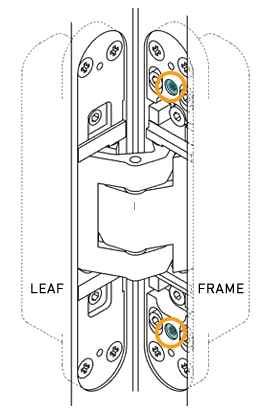
Vertical Adjustment: Step 2 - Adjust the vertical position of the door by turning the lower height adjustment screw. Turn the upper height adjustment screw in the opposite direction if necessary). Retighten the clamping screws
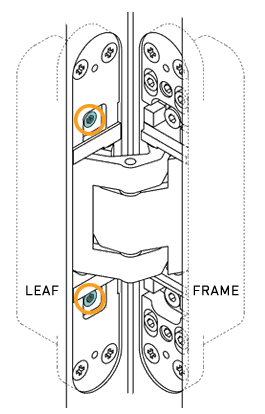
Horizontal Adjustment: Step 3 Adjust the spindles using a 4mm Allen key Towards hinge : twist left (max. 3mm) Towards lock : twist right (max. 3mm)
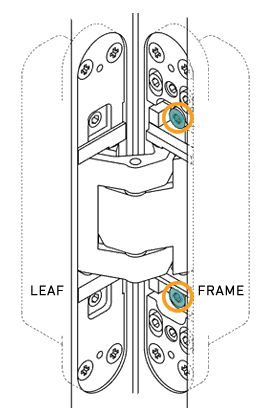
Depth Adjustement: Step 4 - Slightly loosen the fixing screws. Put the door at the correct depth. Retighten the clamping screws.
Install Coverplates
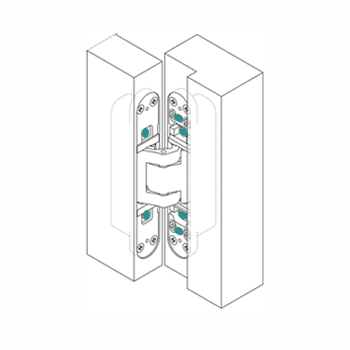
Fix cover plates by means of the enclosed screws.
If you ever need to adjust the door again, simply take the covers off and use your hex key to get the door back into alignment just by following the simple step by step guide above.
That's all there is to it.
Filters
Loading...
Connect
© Copyright 2026 SWS Hardware. All rights reserved.
This website uses cookies to ensure you get the best experience. Learn more